
Knight League - Mute City I
This much-visited location, presumably the location of the F-Zero league head-quarters, is the 'biggest city on all the Space Federation Planets' and is where each of the three leagues start. Its first course is obviously the simplest, featuring nothing trickier than a right-angle turn, a ramp which might send an inexperienced racer over the edge of the course, and a hairpin to round off the lap, but overall Mute City shouldn't cause any problems on even the highest difficulty level...

 |
| About to hit the Jump Plate... |
 |
| Approaching the hairpin... |
Big Blue
From what I can tell, this is the most popular of all the courses in the original game. This is partly down to its pleasant blue surroundings and ace music, no doubt, but it's also a joy to race around. Aside from the home straight it keeps you on your toes with lots of mainly gentle twists and turns and its generally lovely design, but no section is particularly tough. If only there were a Big Blue II...

 |
| Approaching the Slip Zone... |
 |
| Steering gently through the wibbly bit... |
Sand Ocean
For some reason I always seem to remember this one as the first toughie, but then I actually race on it and remember it's not. There are a number of hairpins, a long sweeping turn, and a short wibbly bit, but it's really not bad at all. The biggest problem is probably getting knocked around by the other racers, especially near turns, but I guess that's not exactly limited to this course!

 |
| This wibbly bit can be tricky in traffic... |
 |
| Hairpins don't come much tighter than this... |
Death Wind I
A newcomer to the game seeing this map before racing on the course could be forgiven for thinking it's an overly simple, even boring course, but once you set off... eeeek! Indeed, the well-named course features a strong cross-course wind which constantly threatens to send you across into the barriers. Still, least it's over quickly. As long as you don't miss those boost pads...

 |
| You don't want to miss many of these... |
 |
| The short, narrow pit lane... |
Silence
The final Knight League course is unsurprisingly the trickiest, featuring almost exclusively right-angle turns, and lots of them. It's not as bad as appearances might suggest though, with liberal use of the shoulder banking buttons proving more than sufficient for dealing with all corners. Silence is also home to the first of the game's few risk/reward shortcuts, although whether it's worth braving the minefield, resultant sharp turn, and possible rough patch to use it is up to you...
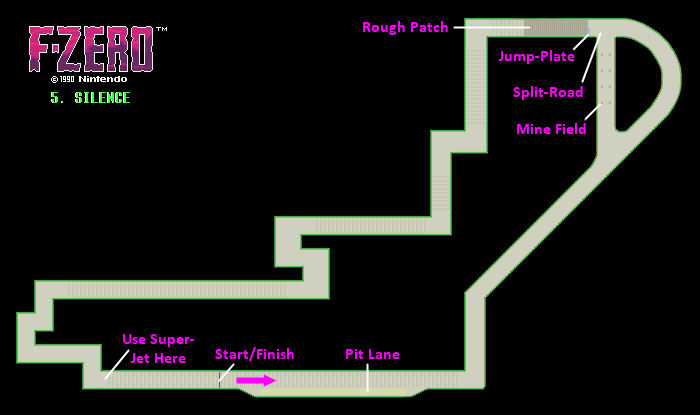
 |
| Eeek! A mighty tricky section here! |
 |
| Taking the slightly riskier short-cut... |
Queen League - Mute City II
New league, same course. Well, kind of. As you might have noticed from the map or been surprised to find while racing, there's now a roundabout in place of the original jump-plate with two jump-plates straight after it, but that's the only change. Don't worry though - there's no give-way or specific direction of travel here. Just make sure to choose early rather than hesitate and panic like some buffoons do!

 |
| Ooo, a lovely sunset this time... |
 |
| Hmm... Left? Right? Left... No, right... |
Port Town I
You'll need to get off to a quick start here in Port Town as the end of the start/finish straight features the game's first track gap - ooof! Luckily there's a ramp before it but you'll need to hit it at a good speed or you'll end up in a crumpled, flaming heap. Another new feature is introduced here too, in the form of track-side magnets which are found amidst the numerous twists and turns of the back straight (or non straight, I guess!), and overall it's a tricky but distinctive course...

 |
| Make sure to get a good landing after this... |
 |
| Stupid side magnets... |
Red Canyon I
This is always a location I look forward to visiting - it features stonking music for one thing, rivalling Big Blue for best music of all, in fact- and like that wobbly planet's course, it's a pleasure to race around too. There are a couple of hairpins, a couple of right-angle turns, but the best feature is a wibbly section of track with jumps and pull-down magnets which can either see you gliding across it gracefully or repeatedly crashing and burning. Practise here can result in some amazing lap times...

 |
| The first of the two opening hairpins... |
 |
| This wibbly section is actually quite nice... |
White Land I
Finally, we reach the glorious White Lands, perhaps the most visually-pleasing planet in the game owing to its crystalline surface, and one that is home to some feature-packed courses too. The first one includes several long turns and hairpins, a couple of which are also slip-zones, as well as plenty of angled turns, and like Red Canyon there is also a section filled with jump-plates... including one right before a turn! It can be a testing course at first but a thrilling one too.

 |
| Avoid the scary bit by going down the middle! |
 |
| Skiddy hairpin ahead... |
White Land II
Unlike the other locations, this return to White Lands sees us visit an entirely new course. It's probably just as turny as the previous one but with fewer scary jumps this time - just one, in fact, but it can be a very tough one. It is located immediately after a right-angle turn and immediately before a biiig gap. The largest track gap in the game, no less, and if you don't hit it at near full-speed, you won't make it. Might be worth saving your Super-Jets here, just in case...

 |
| And another slippy hairpin... |
 |
| The Jump - look how looong it is! |
King League - Mute City III
On to the final league now, and that of course means another visit to Mute City which is again very similar but slightly modified. This time the jump/roundabout area has been fashioned into a jagged section of otherwise normal road, but straight after it is the largest minefield in the game. Unless you're ultra-confident, the safest route through these might be across the rough patches either side of them. A cunning trap to be sure, but it's not enough to make Mute City a place to fear.

 |
| This section can be a pain in traffic... |
 |
| Mines or rough patches? |
Death Wind II
One course that is to be feared, however, is this pesky example. It has only been modified on one side, with a handful of right-angle turns added, but when combined with that bloody wind as well as the unhelpfully-positioned boost pads, it can soon become a nightmare. Of the new section, only the second of the three pads should be used - the other two will send you flying into right-angle turns at super high-speed, resulting in much loss of energy. Considering how small the pit lane is here, that's not good news. I've lost more lives here than on any other course...

 |
| The first of the Boost Pads to avoid... |
 |
| God I hate this bloody course... |
Port Town II
Another return visit here, and again it's very similar to the previous version of the course but with a bit added on, near the end this time. The new section consists of a couple of hairpins, a quick succession of right-angle turns, and a chicane before returning to the home straight. No fancy gadgets or traps then, but the extension does make it even more of a technically demanding course than before...

 |
| The new section can be a right pain.. |
 |
| Especially this bit if there's traffic... |
Red Canyon II
And much like Port Town II, the return to the splendid Red Canyon also sees us race on a very similar course to before, but with an extra section near the end. This one offers the choice of a mined section of road or an off-course jump, then a right-angle turn into a jagged but unproblematic section of road, before a Silence-esque left-right onto the home straight again. Nothing too taxing here at all, surprisingly...

 |
| You'll need to be going fast to reach this... |
 |
| Tight s-bend approaching... |
Fire Field
If the penultimate course's lack of difficulty surprises you, Nintendo made up for it with the final one. It's the only all-new course in the King League which means you won't know what to expect the first time you race here, but to give you an idea: the home straight features a minefield leading to a tight hairpin, then another long straight is interrupted by a tight 'S' section. Then you've got a short straight dotted with rough patches, a couple more tight hairpins, another 'S' section between two long turns, one home to a rough patch, the other to a slip zone. Then a right-angle turn leads to a split road, both parts of which feature side-magnets, before another split section, the longer of which leads to the pit-lane but also a welcome boost pad. Phew! It's a feature-packed course without question, and a worthy final test before the ultimate victory, but is it the toughest of all? Very possibly...

 |
| At the start of the long swoopy, curvy bit... |
 |
| A short split-section... |
And if you made it this far (in the game, not this post), congratulations - you have completed F-Zero! It's actually not all that hard in truth, unless you're brave enough to plump for 'Expert' mode which magically makes all your opponents markedly faster (despite them having certified max speeds). Indeed, playing through the game again has reminded me of how goddamn bloody infuriating it can be on occasion, not that that ever stops me from having another go! Naturally I have my favourite and least favourite things about the game too, so to bring the feature to a close, just in case anyone is interested, here are my personal faves and least-faves. What are yours?
Favourite Course: Red Canyon II - not the easiest course, not the hardest, but a pleasant challenge and one with lots of features that I really enjoy racing around.
Least Favourite Course: Death Wind II - f*ck this f*cking course! Few courses in any racing game enrage me as this one does. Still, it does feel good to do well.
Favourite Machine: Fire Stingray - pretty obvious really; not only is it the fastest of them all but it's also the most stable, with none of that sliding nonsense.
Least Favourite Machine: Golden Fox - not terrible, none of the vehicles are, but despite its acceleration it has the lowest top speed and and also far too delicate.
Favourite Visuals: White Land - I nearly went for Silence but the nice choice of colours, impressive cityscape background, and varied track surface here win out.
Favourite Music: Big Blue - all the music in the game is at least good, but of the tunes that stand out the most, this is my favourite.
Special Note: These course maps were borrowed from Rick Bruns before being somewhat modified by myself. Check out the originals as well as larger, more colourful versions at Rick's site here.
Forgotten most of these. Need to experience thrill of the ride again.... :O !
ReplyDeleteYou should, if you can - it's certainly a unique and thrilling game :)
ReplyDeleteDeath Wind II is the bane of my existence, but the SNES F-Zero is my favorite game of all time.
ReplyDeleteHaha, yeah, Death Wind II has caused more swearing and anger from me than anything else from any game, probably :P
Delete